Showing posts with label Room Transformation. Show all posts

Thursday, July 3, 2025

Summer Series Classroom Transformations: Part 5 Transformation Day - Escape the Circus


It's hard to pick a favorite classroom transformation, but my Escape to the Circus one HAS to be up there. Today we are going to walk through what a day in the life looks like when doing a classroom transformation. This classroom transformation focused on multiplication skills and was an engaging way for my students to practice their times tables skills at the end of the unit before the multiplication final test. 

There was quite a bit of prep work done ahead of time because I created this transformation and all of the activities from scratch. I did not have ready-made materials. I had most of the decor already, because years ago I created a year-long circus theme for my classroom. I sewed the circus bunting and the circus tent for that year-long theme, but I have used them again and again for different room transformations. I did purchase a background to top it all off and clipped it over my whiteboards. 

My class is a multi-grade classroom with 3 grades. I created this transformation to be fully differentiated with three different levels of play, so students worked on the standards for their grade levels, but all did the same activities...only the level of play was more or less challenging. 

 A Day in the Life of a Classroom Transformation

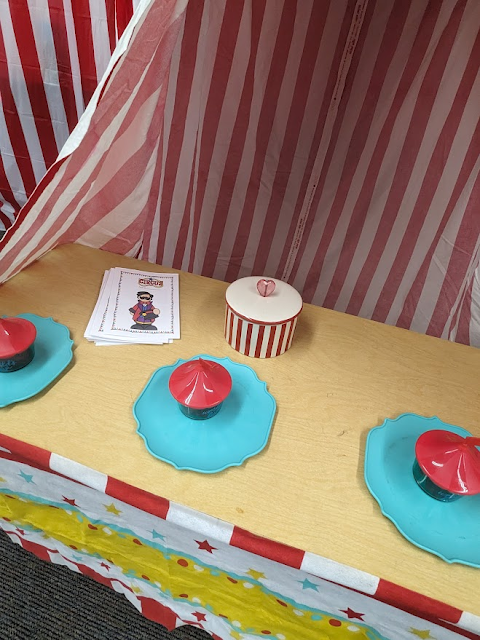
It was the day of our classroom transformation, a multiplication circus escape room, and I was so excited for my students to come through the door. I put some circus music on to set the tone. The classroom was decorated in red and white stripes, and the big top was all ready. 


The students were immediately excited when the door opened and they realized today we were going to the circus. Once everyone found their seats and we were ready to begin, I set up the transformation by starting like a real circus with "Ladies and gentlemen, boys and girls..." and continuing to set up their imaginary trip through multiplication challenges to  escape to the circus. 

I passed out their circus brochures. These would hold the answers to each multiplication challenge. I explained to them that they would be completing puzzles or challenges, solving for a mystery word, and showing me before they could go on to the next challenge. There would be four challenges and students would work with a partner to complete each one. When all four challenges were complete, they would escape to the circus.

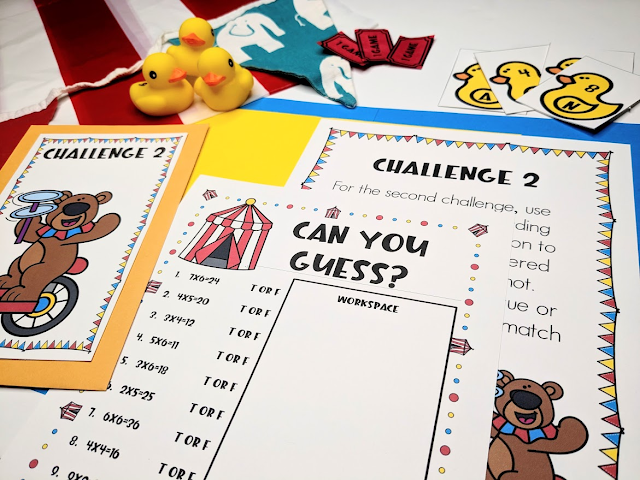
I gave each pair of students an envelope with challenge one inside. It was a puzzle that students would need to complete to find out the first secret word or phrase. Students needed to match the equations to the products to build their puzzle.


This was the most challenging of the activities. It definitely took the longest, but every single pair of students finished it. After students completed challenge one and got it checked by me, the ringmaster, I gave each student a ticket. They were collecting one ticket for each challenge they solved and a bonus ticket if they were the first team to complete all four challenges. The tickets would be used later to play carnival-style games. 

After a pair of students completed challenge one, they received the second challenge. In this challenge, students had to examine multiplication equations that were already solved to determine if the answers were true or false. Then they looked at a set of ducks that had numbers and letters on them. The numbers matched the equation problem numbers. Once they decided which of the equations were true, they took those numbered ducks and lined them up to reveal the next code. Writing it down, they came to me (the ringmaster) to check it and receive a ticket and their next challenge. 


Then it was time for challenge three. For challenge three, students received their envelope with directions. In this challenge, students had circus train cars that had equations on them. Once they solved the multiplication equation, they put the train cars in order from least to greatest products, and that revealed the code. Once again, students checked their secret word/phrase and received a ticket and challenge four when they were correct. 


  Last, students opened their envelopes for challenge 4, students were suppose to play a game of memory match with their partner. Once all the cards were matched, they needed to put the cards in order (by the number on each card) and place the match below. The cards below would spelled out the final clue word or phrase. Students checked this final challenge and received their last game ticket. The first pair of students received a bonus ticket. 

As a side note to this challenge, we started running low on time, and when that happened, I had my students work on this challenge without playing memory match. Instead they simply solved and matched the cards to reveal the code.
 

As students began to finish their challenges, they could use their tickets to play carnival-style games that were set up around the classroom. Students were so excited. I had five different games that students could choose from:

Ring Toss: I had a ring toss game that was marked with different points. Students had to throw the rings, add their score and they won if they reached a certain number of points. 

Basketball: I borrowed a small classroom basketball hoop set that could hook onto my whiteboard. Students threw shots and if they made a certain number of baskets, they won.

Bowling: Students could go bowling and had to knock down a certain number of pins to win.

Nerf Gun Shooting: Students had to use a Nerf gun to shoot a target. If they hit the target, they won. 

Ping Pong Ball Toss: Students had ping pong balls that they tossed into cups. If they landed a certain amount, they won the game. 

I had a table set up with snacks and prizes. As students played the games, they could visit the table for a prize if they won. 

Ring Toss

Bowling

Prizes - purchased at Dollar Tree

When we completed all the challenges and games, our transformation ended. It was a huge success with lots of smiles, hard work, and celebrations. Each student received a circus peanut to try (most had never tried them). I will definitely be repeating this one again in the upcoming year.

Here are some other views of the decor. 


If you are interested in trying this transformation out in your own classroom, I will link it here. Remember, you can do simple, medium, or challenging decor...the choice is up to you, there is no wrong or right way to decorate, but students will enjoy learning under the big top, however you choose to do it. Click on the picture below for more details.


Wednesday, June 26, 2019

Toy-Story-Classroom-Transformation

A Toy Story classroom transformation is the most fun you will have all year! Seriously, there is just so much engagement in something like this that it makes the work in preparing it all worth while! 

For my Toy Story classroom transformation, I started with some ideas from none other than the amazing Hope King (I just happened to visit The Ron Clark Academy last year while she was doing her Toy Story classroom transformation and you can read all about my experience here and here). I was also fortunate enough to go to the Get Your Teach On Conference and hear all about the activities Hope did for her transformation (you can catch up on that over here). I also scoured the internet for other ideas for decorating my classroom. Hope's decor was amazing, but I needed something a little bit more budget friendly. I landed on Amy Lemon's page here and found that she also had a video explaining all about the transformation and how some other teachers all got together and created this experience in each of their rooms...a bit differently according to their personalities. You can find a Facebook live for that right at the bottom of her blog post. She really focused on creating the Toy Story classroom transformation on a budget, which I LOVE!

So here is a peek at what I did to set this Toy Story classroom transformation up. It was not that hard and did not take me more than a few hours of time, but the results and the reactions from the students make it all worth while.

First, I purchased some white poster board, colored poster board, foam board, 4 square boxes, some tablecloths. These supplies are all very cheap and can be purchased from Walmart for not much more than $10. I created some kid-like drawings to represent the drawings in Andy's room from the movie Toy Story. I covered the boxes in brown paper that I already had and cut out some strips from my classroom stash of construction paper and added around the border on the front of each box. I cut out a letter for each box to spell the word Andy. 

For the claw machine, I took a box I already had, cut out a window and covered it in a garbage bag. I used plastic wrap for the window. I cut out shapes from red poster board to make a rocket ship and glued it onto foam board for durability. I threw in some Easter grass that I already had and purchased a few green Easter eggs. I added three wiggly eyes to each egg to make little aliens and put some math problems inside. We used a pair of kitchen tongs as the "claw" to grab out space aliens for this activity. I borrowed Toy Story characters from my son and also purchased two inflatable crayons from Amazon for super cheap. 


I added blue tablecloths to the wall and created clouds from white poster board . I created an Etch-a-Sketch by adding a red frame around my smart TV from red poster board and added some white lids for the dials. I also cued up the Toy Story theme song and playlist to start us off.  


At each table, I placed a different color of tablecloth. I put a small strip of a cow-themed tablecloth on top and added boxes with supplies for the activities as well as a sprinkling of aliens toys, army guys, and small Lego boxes that I found at Dollar Tree. I placed a cowboy hat and bandana at each spot for the students to use during the transformation. I have had both of these for a while and keep them to reuse. 


I did not decorate the entire room, but just a piece at the front, as you can see here. I also cut out letters to spell Toy Story from red and yellow poster board to add to the backdrop.  


Outside of the room, I placed a poster that said Andy's room. I hung black tablecloths over the sliding doors in my room, so no one could see inside.


When my class came up to my room that morning, they saw the poster and the black tablecloths....well, to say they were excited would be an understatement! They were jumping up and down and asking a thousand questions....engagement from the beginning. I LOVE that so much! They had experienced other transformations throughout the year, so they knew they were going to have an amazing time. You can check out some of my other transformations here, here, here, and here

The focus of most of the activities was STEM and teambuilding. I used this during the last week of school when students had a hard time staying focused on work. This transformation helped to change things around for them. The challenges I used were mostly ones from Hope King that I experienced myself at Get Your Teach On. 

One of the activities that I threw in on this transformation was an unlock challenge. I had never done one in my classroom before, but it was super easy to set up and I had experienced one at Get Your Teach On when I went to the conference. I found this one that was called Save the Toys on TPT, printed the tasks, purchased 4 tool boxes from Dollar Tree and also some locks on Amazon (as described by the Save the Toys activity). Overall, I really loved this activity. I found out, though that some groups will have a hard time sticking with the task. Some were not able to solve the codes on the first try and for some, they had several tries. Next time, I will prep them with some strategies for failure and getting up and trying again.


Next year, I am moving schools and also going from second grade to 3rd/4th. I am planning to use this transformation again. I saved everything and plan to use it at the beginning of the school year instead of the end. I think it will be a perfect way to build community at the beginning of the year and review some content that students have already learned in years past. 

Transformations can be a lot of work, but they don't have to be. You can put into it whatever you want. I have done very simple ones and ones way more elaborate than this one. 

Transformations can be expensive, but they don't have to be. You can spend whatever you want on it. For a budget-friendly transformation, use items you have, check out things your own kids have, ask friends, and also don't forget Dollar Tree. You will be surprised what you can find there.

This year I have three new transformations I want to add it. I have been dying to do a glow transformation. I also want to do a candyland one and a cupcake shop for math. Is it a lot? Maybe, but I am determined to continue to grow and use engaging methods that do not sacrifice rigor, but stimulate it, and I have found no better way to reach those goals.


Sunday, November 11, 2018

Camp Share-a-Story


Imagine walking into your classroom. The windows have been covered and it is dark. There's a campfire in the middle of the room and tree trunk seat spots circling it. There is a camp chair and lights and a lantern. Woodland animals are watching from nearby. This is the spot where you will share your first story of the year in an author's celebration. On Friday, my class experienced just this. We called it, Camp Share-a-Story and it was amazing. From the moment the students saw the sign posted on our door and noticed the blackened windows, before they could even step a foot inside, there was excitement outside. And it was brewing as they waited to go in. 


Creating a magical environment in which to share our first stories of the year, was such a fun way to celebrate the learning that we have done. It is one moment that will stick with these students for years when they think back on all they learned and did in second grade. Here's a look at what we did throughout the day to create the magic.


First, we shared our original stories. Afterwards, we celebrated with s'mores pops. We spent time reading books from our book boxes at our campsite with flashlights and headlamps. After lunch, we went on a trail in our woods and did a scavenger hunt. You can find the one we used over here. When we came back from the woods, we used the nature we had collected to create artwork. 


Thursday, August 2, 2018

Classroom Decor Debut

With the start of school around the corner, classroom decor is on the mind of teachers everywhere. I am pleased to introduce My four newest classroom decor sets and show off an old favorite as well.

1. Boho Llama Decor Set
Llamas are popping up in classroom decor everywhere. This is a boho llama set that has muted, boho colors and llamas.


2. Into the Wild Decor Set
Bring the outside in with this stunning nature-themed decor set. This set is sure to add a calm feel to your classroom. Perfect for your little nature lovers!


3. Selfie Decor Set
What student isn't obsessed with selfies? This quirky camera set is a fun way to bring the love of photography and selfies into your class! 

 This is one of the different name plates included in the set.


This is a pink ombre binder cover. It also comes in blue.

This is one of the other binder designs included. It comes in blue as well.

 4. Superhero Decor Set
Superheros are always a classroom favorite. This set has boy and girl superheros. Students will rise to superhero status with this fun set that will inspire the hero in everyone. 


5. Llama Llama Decor Set
This is my best seller. It came out last year just in time for the start of class. It's a fun llama decor in bright colors. The lime green, pink, and navy will brighten up your classroom with lots of fun. 


Friday, July 20, 2018

Boho Llama Decor Bundle

New things are about to happen in my TPT store and I am so excited about it. I have several new decor sets coming out this month, just in time for school. Before I post the new sets, I want to introduce my Boho Llama Set. This set has been up in several pieces for a while now. I am getting everything bundled together and hope to have the full bundle up this weekend. I absolutely love it. A few people have somehow stumbled across some of the pieces that I have up on TPT and are already enjoying them. 

How cute is this alpha banner? Seriously, I absolutely LOVE this style...and the colors have me swooning!


Another look at a small sample of the alpha banner. You can also see some of the positive notes home resting on the little shelf. Love using little notes like this to let parents know that I see the good in their babies. 


These are a couple of the different binder covers that I have for this set. There are six different styles in all, and they are so llama-licious. 


Just a quick peek at the overall look of the set. You can really tie it in with so many different color combinations. You can see a little view of the calendar set as well on the floor in the picture below. 


Love this sweet calendar bulletin board with hanging pieces.


An up close view of the positive notes home.


If you are interested in snagging the full decor set, be on the lookout for its debut this weekend. I will update with a post here. 

Update: My Boho Llama Decor set is now available here.